How to add two-factor authentication to WordPress admin
A stolen password should not be enough. Turn on a second factor for administrators in five minutes, by email or with an authenticator app, and know what to do when someone loses their phone.
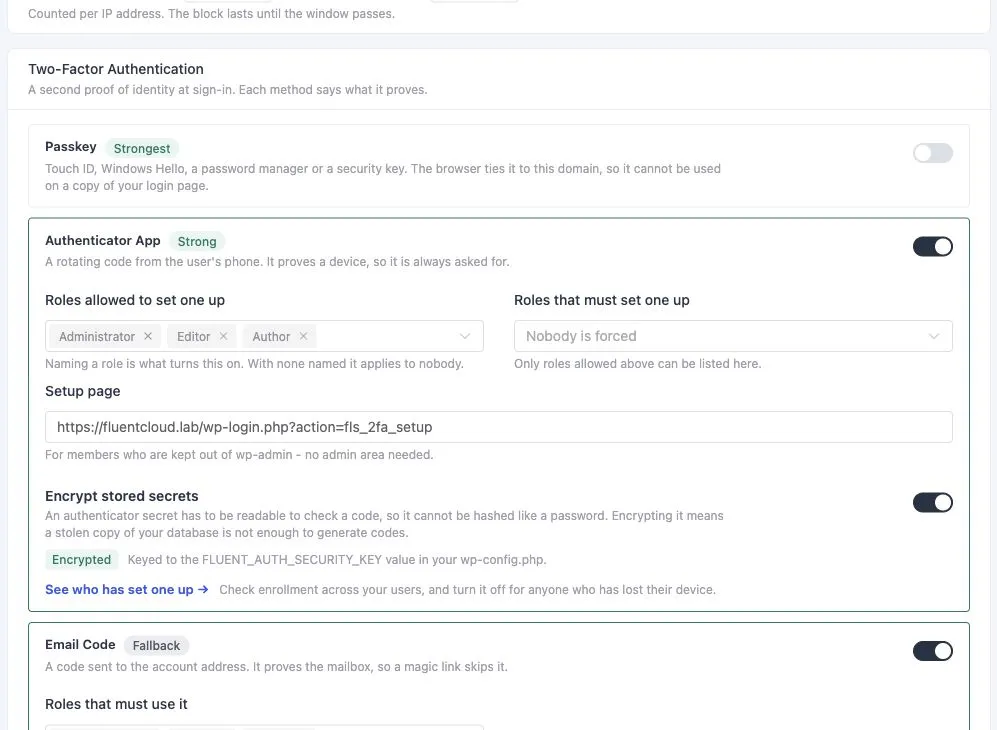
Two-factor authentication means a login needs something you have as well as something you know. The password is the thing you know. The second factor is a code from a phone, an app or an email that an attacker with only the password cannot produce.
For WordPress, the account that matters most is the administrator. An administrator can install a plugin, and a plugin can do anything. This guide turns on a second factor for administrators with FluentAuth, then covers the questions that come up afterwards.
Version note: Email codes have been available since 1.0. Authenticator apps, passkeys and recovery codes were added in 3.0. See the passkey setup guide for the device option.
Before you start
Install FluentAuth from Plugins → Add New if you have not, and make sure the email address on your own profile is one you can read right now. The first thing you will do after turning this on is prove you can get through it.
Step 1: choose the method
This tutorial focuses on email and authenticator app codes. FluentAuth also supports passkeys.
Email codes send a one-time code to the user’s address at login. Nothing to install, and it works for everyone who can read email. Its weakness is that it depends on email delivery; if your host’s mail is slow, so is your login.
Authenticator app codes (TOTP) come from an app on the phone: Google Authenticator, 1Password, Authy, Microsoft Authenticator, or any of the dozens that implement the standard. The code changes every thirty seconds and the phone does not need a signal. It is the stronger option and the one to use for administrators.
Turn on both if you can. Users who enrol an app use it; everyone else in an eligible role gets email codes.
Step 2: turn it on for the right roles
Go to FluentAuth → Settings → General Settings → Two-Factor Authentication.
For email codes, enable Email code and set the roles. Administrator, Editor and Author are the defaults and are the right answer for most sites: they are the roles that can publish or change things.
For authenticator apps, enable Authenticator app, then set two lists:
- Roles allowed to set one up are the roles allowed to enrol an app. Put Administrator here at least; Editor if editors handle anything sensitive.
- Roles that must set one up are the roles that must enrol before they can use the dashboard. Leave this empty for now.
Save.
Step 3: enrol yourself
Open your profile (Users → Profile) and find Two-Factor Authentication. Click Set up authenticator, scan the QR code with your app, and enter the six-digit code it shows.
You are then shown ten recovery codes. Each one signs you in once in place of an app code. Save them where you keep other secrets, a password manager is right, and not in a note on the phone that carries the app.
Step 4: test it
Open a private browser window, sign in with your password, and confirm you are asked for a code. Enter the code from the app. You are in.
Now try again with a recovery code instead. That works too, and the code you used is spent.
Step 5: require it
Once you and the other administrators have enrolled, go back to the settings and add Administrator to Roles that must set one up. From now on an administrator without an app enrolled is shown the setup page instead of the dashboard until they do it. That is the setting that turns “we should all use 2FA” into “we all do”.
Choose requirements for editors and authors based on their access and the sensitivity of the site. Email codes depend on mailbox security; device methods add an independent proof.
What about logins that skip the form?
An attacker with a password does not have to use the login form. Application passwords let a
script authenticate to the REST API directly, and a plugin can call wp_set_auth_cookie()
from anywhere.
FluentAuth enforces the second factor on those paths too. A user whose role requires a factor cannot get a session without one, whichever door they use. If you do not use application passwords for anything, turn them off altogether under Core Security; that is one door fewer.
When someone loses their phone
This is the question that makes people put off two-factor, so here is the whole answer.
- They have their recovery codes. They sign in with one, then reset and re-enrol from their profile. Two minutes.
- They do not, but another administrator exists. That administrator opens Settings → 2FA Enrollment, finds them, clicks Reset. They enrol again at next login.
- They are the only administrator and have nothing. Deactivate the plugin from the
server, with
wp plugin deactivate fluent-securityor by renaming the plugin folder over SFTP, sign in, reactivate, re-enrol. Settings survive the deactivation.
Case three is why a site should have two administrators, or one administrator with recovery codes in a password manager. It is not a reason to skip the second factor.
What it costs
Nothing, in money. In time, one extra step per login for the roles that can do damage, and no extra step for anyone else. Against the Wednesday morning where you discover a new administrator you did not create, it is the best trade in WordPress.
The two-factor documentation has every setting and the developer hooks.